Replacing the drive unit
Removing the mixer shaft from the drive unit
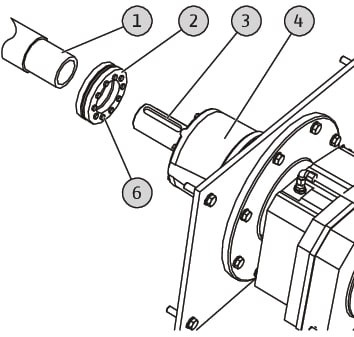
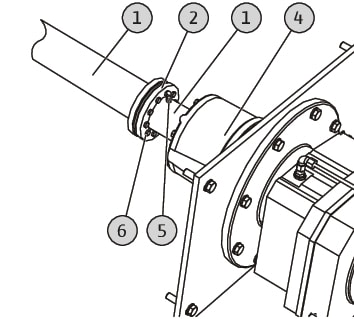
1 | Mixer shaft |
2 | Shrink disc |
3 | Output shaft |
4 | Drive unit |
5 | Grub screw |
6 | Hexagon head screw |
- Propeller blades are removed. See “Attaching the propeller blades”.
- Cover cap is removed. See “Mounting the cover cap”.
- Align mixer shaft and drive unit horizontally: Position scantlings under the mixer shaft and drive unit.
- Unscrew the grub screw.
- Loosen the hexagon head screws on the shrink disc.
- Remove the mixer shaft from the output shaft.
- Remove the shrink disc from the mixer shaft.
Mounting the mixer shaft on the drive unit
- Place the shrink disc on the upper end (tapered end) of the mixer shaft and slide up as far as it will go.
- Place the mixer shaft on the output shaft and slide up as far as it will go.
- Turn the mixer shaft until the grub screw’s take-up opening is exactly above the groove on the output shaft.
- Screw in the grub screw until hand-tight.
- Tighten the shrink disc’s hexagon head screws in a crosswise manner until hand-tight.
- Tighten hexagon head screws crosswise. For torque, see “Shrink disc tightening torques”.
- Ensure that the mixer shaft is securely attached.
- Drive unit is replaced. Install the mixer and put it into service.