Replacing the hub
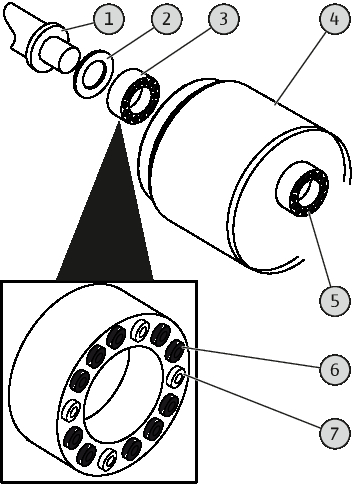
Disassembling the hub
1 | Mixer shaft |
2 | Flat gasket |
3 | Tensioning kit, rear |
4 | Hub |
5 | Tensioning kit, front |
6 | Interior hexagonal head screw, black |
7 | Interior hexagonal head screw, silver |
- Propeller blades are removed. See “Attaching the propeller blades”.
- Cover cap is removed. See “Mounting the cover cap”.
- Align the mixer shaft horizontally: Position scantlings under the mixer shaft.
- Loosen the interior hexagonal head screws (black and silver) of the front tensioning kit.
- Loosen the tensioning kit: screw out silver screws (M8). Screw in M10 screw and loosen tensioning kit.
- Pull the front tensioning kit off the mixer shaft.
- Loosen the interior hexagonal head screws (black and silver) of the rear tensioning kit.
- Loosen the tensioning kit: screw out silver screws (M8). Screw in M10 screw and loosen tensioning kit.
- Pull the hub off the mixer shaft.
- Pull the front tensioning kit off the mixer shaft.
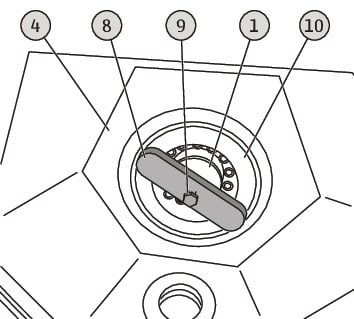
Installing the hub
1 | Mixer shaft |
4 | Interior view of hub |
8 | Stretching device (auxiliary tool) |
9 | Hexagon head screw |
10 | Hub ring |
- New flat gasket to hand.
- Stretching device to hand.
- Place the flat gasket on the lower end of the mixer shaft and slide up as far as it will go.
- Place the rear tensioning kit on the mixer shaft and slide up as far as it will go.
- Place the hub on the mixer shaft and slide up as far as it will go.
- Tighten interior hexagonal head screws (4x silver) in a crosswise manner until hand-tight.
- The hub is now secured against slipping.
- Tighten interior hexagonal head screws (10x black) in a crosswise manner until hand-tight.
- Place stretching device on mixer shaft and hub ring.
- Affix the stretching device to the mixer shaft: Screw in the hexagon head screw through the stretching device and into the centring hole in the mixer shaft.
- By slowly turning the hexagon head screw, mount the hub completely on the mixer shaft.
- Tighten all interior hexagonal head screws in a crosswise manner. Tightening torque: 35 Nm (26 ft·lb)!
- The hub is firmly fixed to the mixer shaft.
- Remove the stretching device: Remove the hexagon head screw.
- Tighten covered interior hexagonal head screws in a crosswise manner. Tightening torque: 35 Nm (26 ft·lb)!
- Place the front tensioning kit on the mixer shaft and slide up as far as it will go.
- Tighten front tensioning kit: Tighten all interior hexagonal head screws in a crosswise manner. Tightening torque: 35 Nm (26 ft·lb)!
- Hub is replaced. Install the mixer, attach the propeller blades and mount the cover cap.