Changing gear oil with in-built tool
NOTICE
In-built tool for easy oil changing
Consult the motor’s rating plate for information on oil type and quantity. Consult the manufacturer’s instructions for safety instructions and detailed work instructions on changing the oil. The following section relates exclusively to the work steps with the in-built tools!
The position in which the drive unit is installed means that the gear’s oil drain plug is located directly above the floor fixation. An oil drain line is mounted to the oil drain opening for easy oil change.
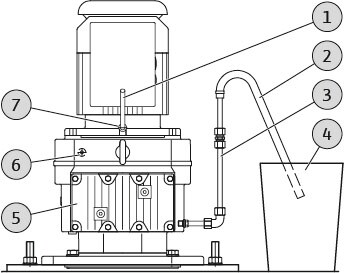
1 | Connection piece for compressed air |
2 | Drain hose |
3 | Oil drain line with dummy plug |
4 | Collector tank |
5 | Gear |
6 | Oil level screw |
7 | Oil filler opening |
- Mixer has been decommissioned.
- Drive unit has cooled, been cleaned and, if necessary, disinfected.
- Work area has been prepared.
- Protective equipment has been put on.
- Tools/aids to hand:
- Drain hose, length approx. 0.5 m (20 in)
- Compressed air hose, inside diameter 10 mm (0.5 in)
- Compressed air, max. 0.8 bar (11.5 psi)
- Collector tank of sufficient volume
- Funnel - Manufacturer’s safety instructions have been read and implemented!
- Remove the screw plug from the oil filler opening.
- Screw the connection piece into the oil filler opening.
- Connect the compressed air to the connection piece.
- Remove the dummy plug from the oil drain line.
- Attach the drain hose to the oil drain line.
- Place the drain hose in the collector tank.
- Slowly release the compressed air. Max. pressure: 0.8 bar (11.5 psi)
- Drain the gear.
- Ignore any minimal residues.
- If significant residues remain in the gear, rinse the gear repeatedly with cleaning oil.
- Inspect the oil in the collector tank:
- If the oil is heavily contaminated, rinse the gear repeatedly with cleaning oil.
- If the oil contains metal chips, notify customer service!
- Remove the drain hose from the oil drain line.
- Seal the oil drain line with the dummy plug.
- Detach the compressed air and connection piece from the oil filler opening.
- Remove the oil level screw to allow venting.
- Pour new oil into the oil filler opening using a filling funnel.
- Screw in the oil level screw and the oil filler opening’s screw plug.
- Check all screw plugs for impermeability.
- Oil change is complete. Recommission the mixer.